Table of materials
A graphic envelope is created by moving a line according to a defined rule. This precise movement generates an elegant curve, the envelope, which seems to connect all successive positions of the line. For a triangle, the line slides along its sides, pivoting around a fixed point at each vertex. This method provides a fun way to explore geometric shapes and sparks the imagination of younger minds. Whether for fun, learning, or starting string art, it encourages creativity. In this article, we’ll guide you step-by-step to create a triangular envelope, using an equilateral triangle of 10 cm divided into nine segments.
Article Summary:
To make a triangular envelope, you’ll need..:
Materials: a pencil, an eraser, a ruler and a sheet of paper.
First step: Draw an equilateral triangle
Second step: Graduating and orienting the equilateral triangle
Third step: Understand the basic process
Fourth step: Reproduce the process in the triangle.
1 - The right equipment for the triangle
Whether you prefer pencil and paper or are passionate about technology, many tools are available. For a manual approach, a simple pencil, eraser, ruler, and paper make it easy to create your triangle (envelope). If precision and experimentation are your focus, design software like Illustrator, Photoshop, Clip Studio, or Inkscape offer a wide range of options. Additionally, dynamic geometry software such as GeoGebra or Cabri allows real-time visualization of transformations, helping you grasp mathematical concepts. Finally, programming tools like Python (matplotlib) or Processing open the door to unique, highly personalized creations.
2 - Making the triangle
... Step 1: Drawing an equilateral triangle
To begin this activity, it is essential to draw a perfect equilateral triangle. This shape was chosen for its simplicity, as its regularity makes initial constructions easier and clarifies the steps. With 10 cm sides, the triangle is easy to handle for our exercises. To enhance clarity, consider coloring the three sides in different colors or labeling the vertices A, B, and C. These visual tips, whether done manually or with digital tools, make the next steps more intuitive.
... Step 2: Graduating the equilateral triangle
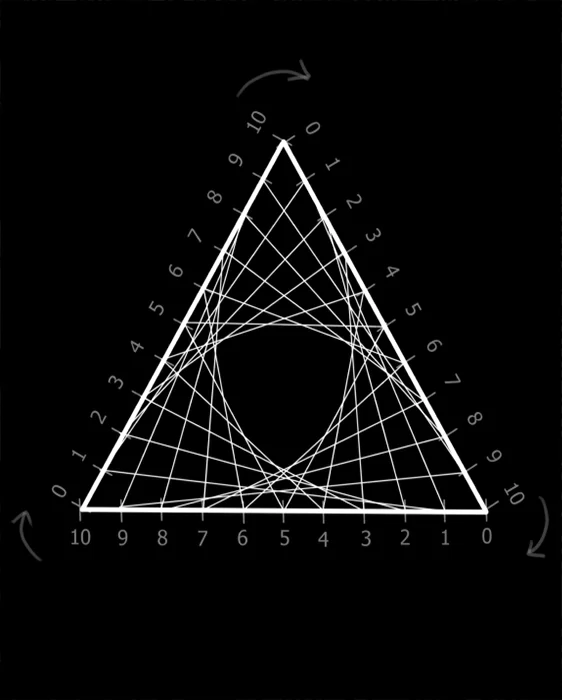
Now that our equilateral triangle is drawn, we will begin to mark it. Place 9 equidistant points on each side, numbering them from 0 to 10. It is crucial to choose a consistent direction for all sides of the triangle. For instance, we can decide to move from right to left across the triangle.
... Step 3: Understanding the basic process
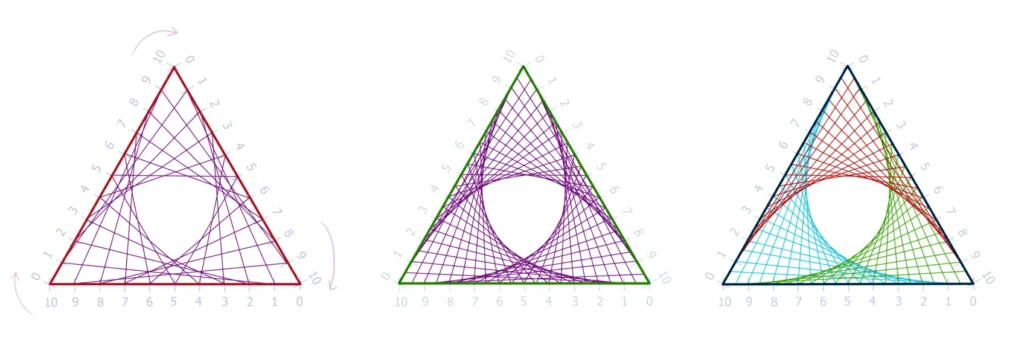
Our envelope will gradually take shape. Let’s repeat this simple motion: Start by connecting points with the same number on the red and purple sides—1 with 1, 2 with 2, 3 with 3, and so on, up to 9 with 9. It’s like assembling puzzle pieces, but with lines!
... Step 4: Reproduce the process in the triangle
Let’s repeat the process: connect the corresponding points on consecutive sides—purple and green, then green and red. It’s crucial to follow the direction. With each step, the envelope takes shape as the segments link together like puzzle pieces.
3 - Exercises around the triangle
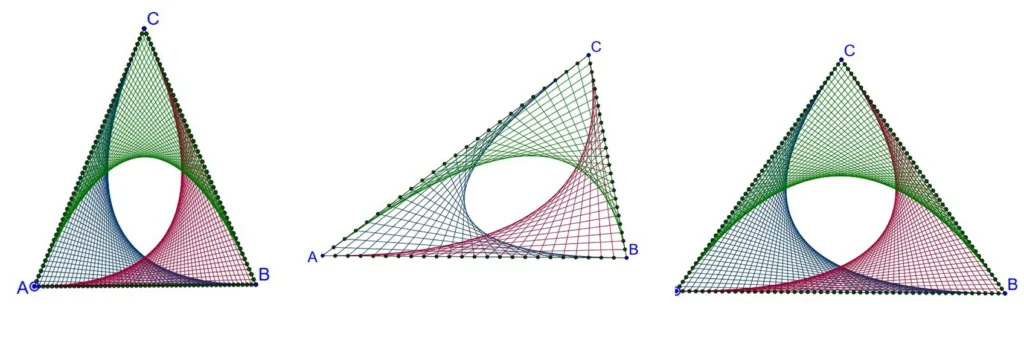
To spice up our geometric explorations, why not add a touch of creativity? Imagine our 10 cm equilateral triangle, now graduated more precisely every 0.5 cm. By connecting the points in new ways, we could create even more intricate patterns. Additionally, let’s step off the beaten path and experiment with isosceles triangles. What if the base is half the length of the sides? The possibilities are endless! For a unique flair, we can use different colors or even threads stretched over a wooden base. Geometry then becomes a playground where imagination knows no bounds. So, ready to explore new creative horizons?
4 - Envelopes and shapes :
Building envelopes goes beyond a simple manual activity; it becomes a true mathematical exploration. Using basic shapes like triangles, squares, or circles, one can create complex and fascinating curves. Each envelope hides a world of geometric concepts, such as rotation, tangency, and the envelope principle itself. This activity offers more than just fun, as it makes abstract ideas concrete and accessible, making math more engaging. Moreover, the variety of possible shapes and the aesthetic results make this practice a powerful spark for creativity. Whether with paper, software like GeoGebra, or traditional tools, exploring envelopes opens the door to an endless, captivating mathematical universe.
Did you like this useful article? Like it and share it with others!
generative art: from…
One fascinating aspect of digital art is generative art. It uses computer programs to create works of art on its…
Why order a…
Who wouldn’t want to get a portrait that captures the very essence of who they are? A portrait transcends a…
Digital art gallery…
Digital art, born from technological advancements, has reshaped global artistic landscapes. While the West pioneered this movement, Africa, particularly Cameroon,…

Author
I’m Mba Verlaine, a Cameroonian artist passionate about African culture. Follow my blog for art, traditions, and personal insights.
